关于SSH的使用——客户端篇
本文正在编写中...
参见 Reference 部分。
TL;DR
Secure Shell is a protocol used to securely log onto remote systems. It can be used for logging or executing commands on a remote server. More information: https://man.openbsd.org/ssh.
- Connect to a remote server:
ssh username@remote_host - Connect to a remote server with a specific identity (private key):
ssh -i path/to/key_file username@remote_host - Connect to a remote server with IP
10.0.0.1and using a specific [p]ort(Note:10.0.0.1can be shortened to10.1):ssh username@10.0.0.1 -p 2222 - Run a command on a remote server with a [t]ty allocation allowing interaction with the remote command:
ssh username@remote_host -t command command_arguments - SSH tunneling: [D]ynamic port forwarding (SOCKS proxy on
localhost:1080):ssh -D 1080 username@remote_host - SSH tunneling: Forward a specific port (
localhost:9999toexample.org:80) along with disabling pseudo-[T]ty allocation and executio[N] of remote commands:ssh -L 9999:example.org:80 -N -T username@remote_host - SSH [J]umping: Connect through a jumphost to a remote server (Multiple jump hops may be specified separated by comma characters):
ssh -J username@jump_host username@remote_host - Close a hanged session: <Enter><~><.>
公钥认证
默认情况下,SSH 会寻找 ~/.ssh/id_* 作为私钥,其中 * 部分可以是 rsa、ecdsa、ed25519 等,也可以通过 -i 参数指定私钥文件。私钥的文件名加上 .pub 后缀就是公钥文件,暂时没有方法指定公钥文件的路径。如果要在配置文件中指定一个或多个私钥,可以使用 IdentityFile 选项,例如:
Host example
  IdentityFile ~/.ssh/id_rsa
  #CertificateFile ~/.ssh/id_rsa-cert.pub
一般来说,除非为了兼容一些非常古老(如 10 年前的)或非常简单的(如嵌入式)系统而不得不使用较短的 RSA 密钥对的时候,我们推荐使用 Ed25519 密钥对,或者 ECDSA 密钥对。这两种基于椭圆曲线的密码学算法比 RSA 更安全,而且性能也更好。如果不得不使用 RSA 的话,请尽可能使用 3072 位或更长的密钥长度。密钥长度可以在使用 ssh-keygen 生成密钥对时指定(-b),其中不同算法支持与推荐的长度也是不同的:
| 算法 | 支持长度 | 推荐长度 | 说明 |
|---|---|---|---|
| RSA | 1024-4096 | 3072 或以上 | 曾经的推荐长度是 2048 位,但 2020 年以后认为这个长度已不够安全 |
| ECDSA | 256 / 384 / 521 | 256 / 384 / 521 | 由于椭圆曲线参数选择的特殊性,只有这三种长度可选。注意最后一个选项是 521,不是 512 |
| Ed25519 | - | - | Ed25519 是基于 Edwards 曲线的算法,没有“长度”这种参数 |
端口转发(Port Transportings)
SSH 配置 TCP 端口转发的格式为 [bind_address:]port:host:hostport,SSH 支持三种端口转发:
动态端口转发(Dynamic port forwarding)
在本地监听一个端口用作 SOCKS5 代理。
例1 SOCKS服务器
ssh -D 1080 vps -N
此时可将远程主机 vps 作为 SOCKS 服务器使用,比如 curl -x socks5://localhost:1080 google.com。可以代理绝大多数软件:浏览器,社交媒体,开发工具(如 Git)等。
另外,对于大学生来说,SSH 动态端口转发结合 OpenVPN 使用可以突破学校上网设备限制。
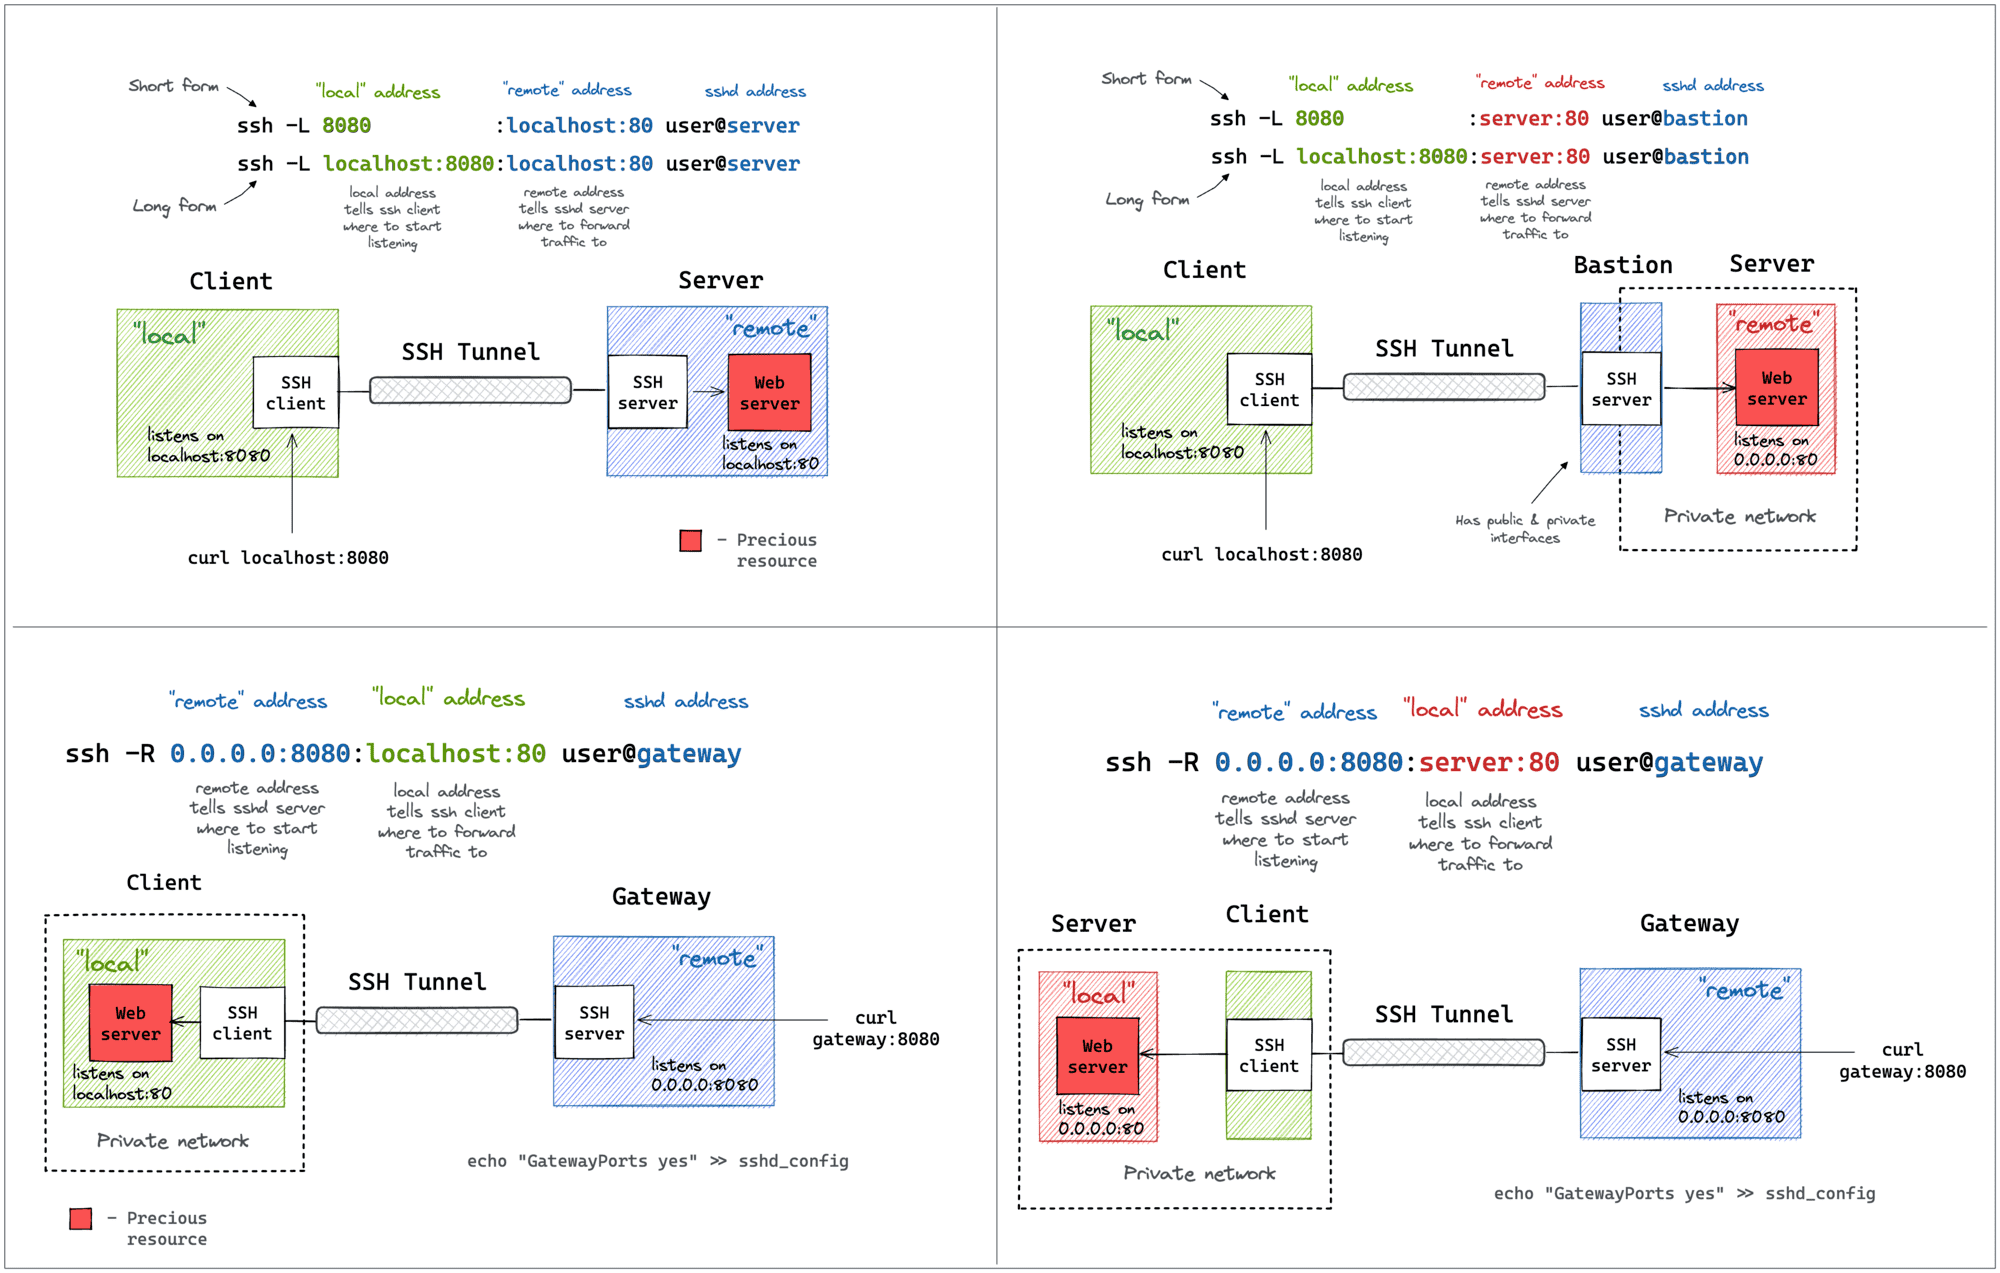
本地端口转发
也叫 Single port forward TCP tunnels。
ssh -L 0.0.0.0:8000:localhost:8000 host -N
远程端口转发
也叫 Reverse TCP Tunnels。
本地端口转发和远程端口转发的工作模式可以结合由 Ivan Velichko 绘制的图片来理解:
结合端口转发与代理的例子
让服务器使用本机的SSH密钥和网络环境。
一行命令。
ssh -A -D 1134 localhost -t ssh -A -R 1220:localhost:1134 [user]@remote_server -t http_proxy=socks5h://127.0.0.1:1220 https_proxy=socks5h://127.0.0.1:1220 all_proxy=socks5h://127.0.0.1:1220 bash
这里使用了嵌套式的 SSH 命令连接远程主机。首先在本地使用动态端口转发启动一个 SOCKS 服务器,然后通过远程端口转发把本地 SOCKS 服务器端口转发到远程服务器,并且直接设置好代理的环境变量,这里设置了 SOCKS5H 协议,让远程服务器也使用本机的 DNS 解析。这样实现了让远程服务器使用本地的 SSH 密钥和网络环境的功能。
其中 -A 开启 SSH Agent 转发,用于转发添加到 SSH Agent 的密钥到远程服务器,-D 1134 localhost 在本地开启一个端口在 1134 的服务器,-t 强制 tty 分配,用于命令执行。
ssh -A -D 1134 localhost -t ssh -A -R 1220:localhost:1134 [user]@remote-server
export http_proxy=socks5h://127.0.0.1:1220 https_proxy=socks5h://127.0.0.1:1220 all_proxy=socks5h://127.0.0.1:1220
可以使用 ssh -v <URL>,查看日志来观察是否远程服务器使用了本机的密钥。
使用 curl -4 ip.sb,查看远程服务器是否使用了本机作为代理,若成功你应该看到的是本机的IPv4。
跳板
ssh -J jumpuser1@jumphost1,jumpuser2@jumphost2,...,jumpuserN@jumphostN user@host
登陆到 —J 指定的 jumpuser1@jumphost1,再从 jumphost1 登陆到 jumpuser2@jumphost2,以此类推来登陆到目标远程主机。在网络环境直接与目标主机隔离的时候有用,比如可以将 AWS 海外服务器作为跳板登陆其他海外的服务器。
连接复用
X11转发
配置文件
SSH可以在配置文件中使用任意的命令行参数。
Reference
- ssh - tldr pages
- SSH 原理与运用(二):远程操作与端口转发
- SSH 使用技巧 - Linux 201 by USTC LUG
- An SSH tunnel via multiple hops - superuser.com
- Using SSH agent forwarding - GitHub Docs
还在看的资料
https://www.baeldung.com/linux/ssh-tunneling-and-proxying 讲了更多关于 SSH Tunnel 和代理的。
https://plantegg.github.io/2019/06/02/%E5%8F%B2%E4%B8%8A%E6%9C%80%E5%85%A8_SSH_%E6%9A%97%E9%BB%91%E6%8A%80%E5%B7%A7%E8%AF%A6%E8%A7%A3--%E6%94%B6%E8%97%8F%E4%BF%9D%E5%B9%B3%E5%AE%89/ 讲了很多琐碎的东西,但似乎看起来写的不好,太过冗杂了,解释的也不清楚。